Laptop speakers are usually tuned for size, price, and maximum apparent loudness. On my Acer Swift running Linux Debian the result was as you’d expect: thin bass into the tin bucket, uneven mids, and voices or instruments that are not what they sound in real life.
EasyEffects made a clear improvement without replacing PipeWire which handles audio by default. This post outlines the setup I ended up using, including a community preset with a few tweaks of my own, plus CPU load numbers.
What this setup uses
- Acer Swift 14″ laptop
- Linux Debian 13 with PipeWire
- EasyEffects
- The Advanced Auto Gain preset from JackHack96/EasyEffects-Presets
- A 130 Hz high-pass filter added for the Acer’s small speakers
- A conservative limiter ceiling of -1 dB
The EasyEffects project also maintains a useful Community Presets page. It specifically highlights Advanced Auto Gain as a preset that works well with laptop speakers.
1. Install EasyEffects and the required plug-ins
On Debian 13, install EasyEffects plus the LSP and Calf plug-in collections:
sudo apt update
sudo apt install easyeffects lsp-plugins-lv2 calf-plugins
This installed nine packages on my system and took up about 241 MB.
Launch EasyEffects UI from the application menu and ensure that you are working on the Output side, since this guide is for speakers and headphones, not the microphone input (let me know if you try that too).
2. Import the community preset
Download the Advanced Auto Gain output preset from the JackHack96 preset repository, then import its JSON file in EasyEffects:
- Open Presets.
- Choose Import Preset.
- Select the downloaded JSON file.
- Load Advanced Auto Gain.
I prefer manual import over piping a remote installer script into the shell. It makes the change easier to inspect and limits it to the one preset we actually need.
After loading, the output chain should contain:
Equalizer → Exciter → Auto Gain → LimiterBefore changing anything, save a copy under a new name such as:
My-Acer-LaptopThat preserves the imported original as an easy rollback point.
3. Add a laptop-safe high-pass filter
The preset improves body and loudness consistency, but tiny laptop drivers cannot reproduce deep bass cleanly. Asking them to do so wastes excursion and can cause buzzing or muddy mids.
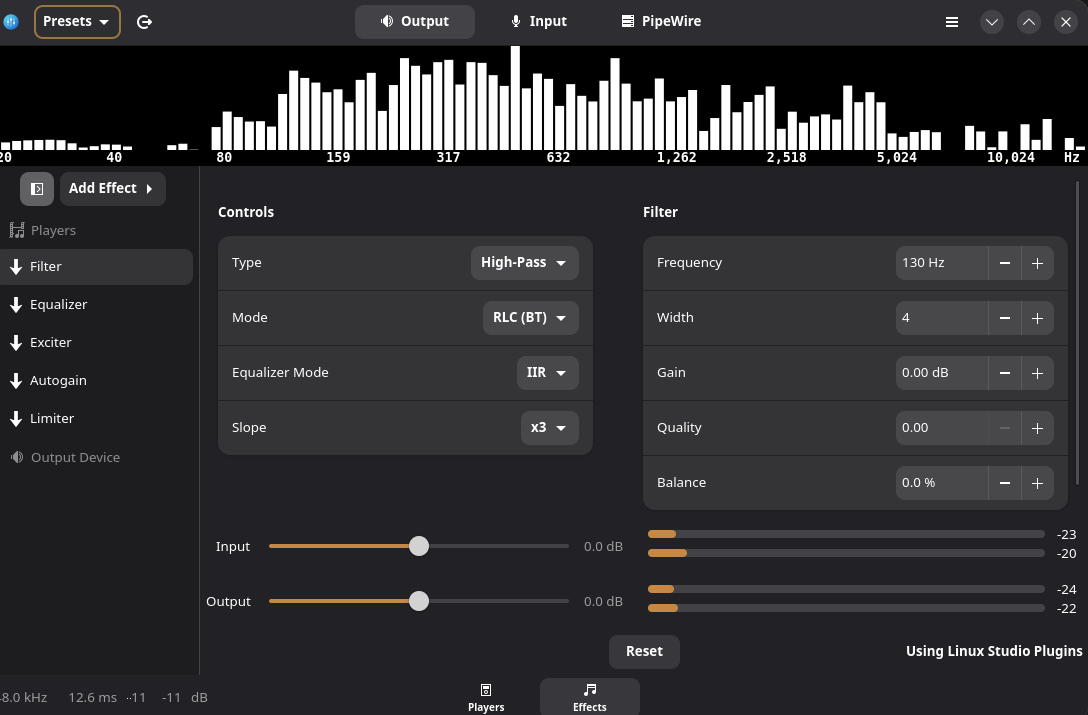
Add a Filter as the first effect in the chain, then use these settings:
| Setting | Value |
|---|---|
| Type | High-pass |
| Mode | IIR |
| Design | RLC (BT) |
| Frequency | 130 Hz |
| Slope | x3 |
| Gain | 0 dB |
| Balance | 0 |
The complete chain should now be:
Filter → Equalizer → Exciter → Auto Gain → LimiterWhy 130 Hz? It is a reasonable starting point for small laptop speakers – 130 Hz removes bass the drivers can’t reproduce anyway.
If the buzz is still noticeable on bass-heavy tracks, try 140 or 150 Hz. For too thin and perfectly clean sound, try 120 Hz to recover that low-mid warmth. Change only one setting at a time.
4. Make the limiter conservative
Open the final Limiter effect and set:
| Setting | Value |
|---|---|
| Threshold | -1.0 dB |
| Gain/threshold boost | Off |
| Auto Leveling | Off |
| Stereo link | 100% |
| Oversampling | Half x4 |
Keep attack, release, and lookahead settings at the default values.
The -1 dB ceiling provides a little protection against inter-sample peaks and unexpected increases in volume. Also, if the automatic boost is disabled the limiter will no longer convert the recovered headroom into greater loudness.
Save the preset after making these changes.
5. Test before enabling it automatically
Start with the system volume around 40% and listen to three different kinds of material:
- A spoken-word recording, to check vocal clarity
- A dense rock or electronic track, to expose congestion and limiter pumping
- A track with sustained low notes, to reveal speaker rattle
Do it again with about 70% and compare the preset with EasyEffects bypassed, but match perceived loudness as closely as possible. Remember that louder usually sounds better in a quick comparison. Even experienced listeners easily confuse differences in sound quality with differences in volume. Louder audio just sounds more detailed and hence perceived as better.
Listen for:
- Buzzing or rattling from the chassis
- Sharp or tiring vocals
- Bass notes making the rest of the mix duck unnaturally
- Audible pumping as Auto Gain or the limiter reacts
- One speaker sounding different from the other
If the laptop rattles, raise the high-pass frequency first, before lowering the rest of the EQ. If the sound is harsh, reduce the Exciter amount slightly. Do not boost frequency bands that are very low, such as 25 or 60 Hz; the built-in speakers cannot turn that into useful acoustic bass.
When a preset has survived several tracks and videos, use EasyEffects’ preset autoload controls to link it with the built-in speaker output. Note it is best to keep headphone processing separate since a filter designed to protect tiny laptop speakers can make good headphones sound unnecessarily thin.
6. Let EasyEffects run in the background
EasyEffects can keep processing after its main window is closed which is handy with autostart. In the preferences, leave Shutdown on Window Closing disabled. Enabling the inactivity timeout can also reduce unnecessary work when no audio is playing.
On my 12-thread system, the estimated cost of the actual load was about 0.32% of total CPU.
Was JDSP4Linux worth switching to?
I also considered JDSP4Linux as a potentially lighter alternative. It offers EQ, a compander, harmonic processing, convolution, stereo effects, and limiting. However, it cannot directly import this EasyEffects chain, so matching the sound would require rebuilding and retuning the profile manually. If you do it – let me know.
Final result
Running EasyEffects on my laptop costs less than 1% of CPU in my test – and even less so with the 10-second auto-switch-off where it only runs when something’s playing. It felt like an easy win for sound that’s richer and clearer than the default.
I thought I was stuck with my terribly-sounding laptop speakers forever. Turns out fixing that took about five minutes, and listening to Stravinsky now is almost a pleasure.
Hats off to osnews for the article that prompted me to try it out!